
11 Steps to iPhone 14 Pro Screen Replacement
2022-10-25
The iPhone 14 series has been out for some time now. For some of you who are careless, your phone has probably been dropped quite a few times. If your iPhone 14 Pro screen is cracked, doesn't respond to touch, or your iPhone doesn't display pictures when you turn it on, use this guide to get your iPhone back in working order with a new screen, also known as a display assembly.
For your safety, reduce the battery charge to less than 25% before dismantling the unit. This will reduce the risk of a fire if the battery is accidentally damaged during the repair process. If your battery has swollen, please take appropriate precautions.
Note: After replacing the screen, the "True Tone" and "Auto Brightness" features will be disabled, even if the original Apple screen is used. Face ID will also be disabled unless the iPhone is running iOS 15.2 or newer.
When reassembling your device, you will need to replace the adhesive to reconnect the screen. Your device will work normally, but will most likely lose its IP (''ingress protection'') rating.
Step 1 Remove the Pentalobe Screws
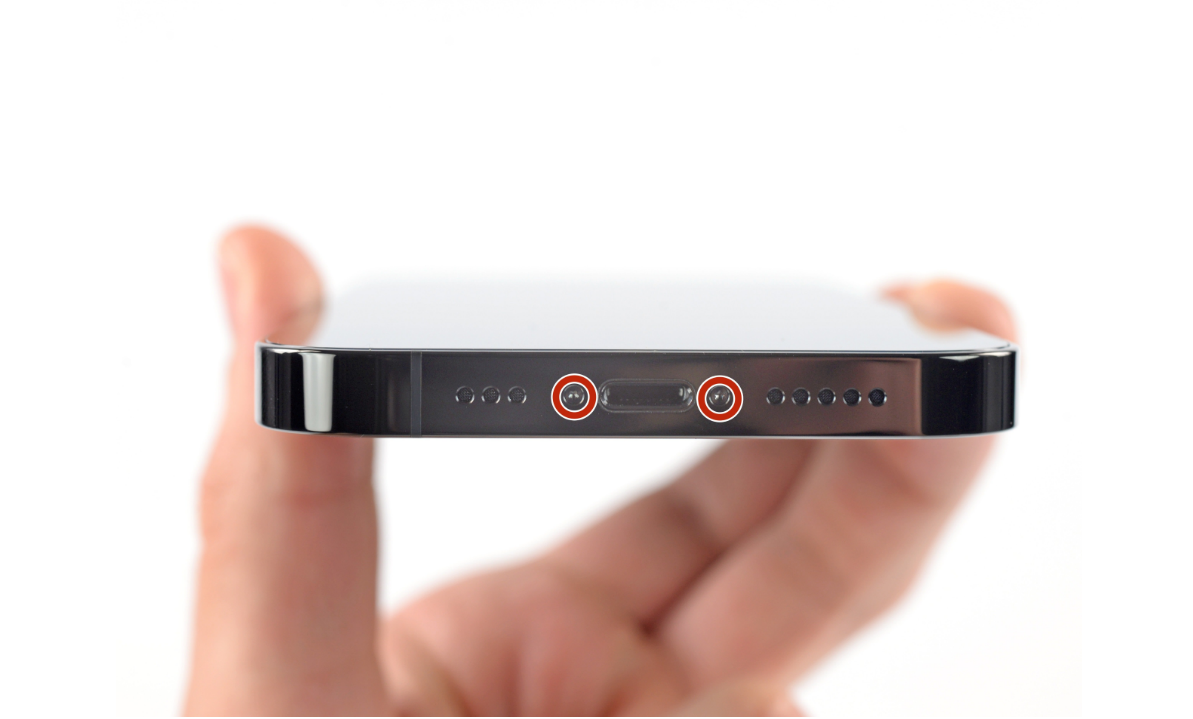
1.Before you start disassembling iPhone, turn off the power.
2.Remove the two 6.8 mm long pentalobe P2 screws on the bottom edge of the iPhone.
For your safety, reduce the battery charge to less than 25% before dismantling the unit. This will reduce the risk of a fire if the battery is accidentally damaged during the repair process. If your battery has swollen, please take appropriate precautions.
Note: After replacing the screen, the "True Tone" and "Auto Brightness" features will be disabled, even if the original Apple screen is used. Face ID will also be disabled unless the iPhone is running iOS 15.2 or newer.
When reassembling your device, you will need to replace the adhesive to reconnect the screen. Your device will work normally, but will most likely lose its IP (''ingress protection'') rating.
Step 1 Remove the Pentalobe Screws
1.Before you start disassembling iPhone, turn off the power.
2.Remove the two 6.8 mm long pentalobe P2 screws on the bottom edge of the iPhone.
Step 2 Heat the Bottom Edge of Your iPhone
Heating the bottom edge of the iPhone helps to soften the adhesive holding the screen in place, making it easier to open.
You can also use a hair dryer, heat gun or electric heating plate, but be careful not to overheat. The edges should be a little hot to the touch.
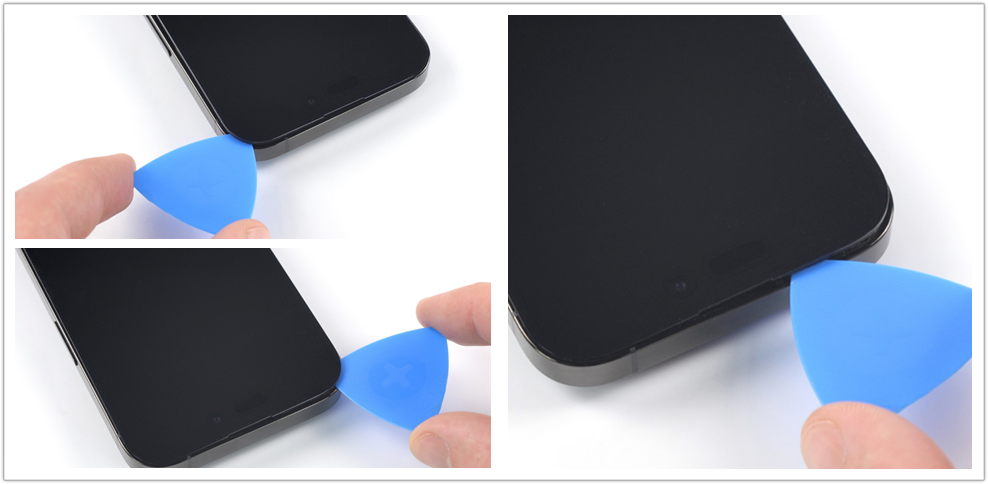
Step 3 Insert An Opening Pick
1.Use the suction handle on the bottom edge of the screen while avoiding the edges of the glass.
2.Pull up on the suction handle with firm, constant pressure to create a slight gap between the front panel and the rear case.
3.Insert an opening pick in the gap.
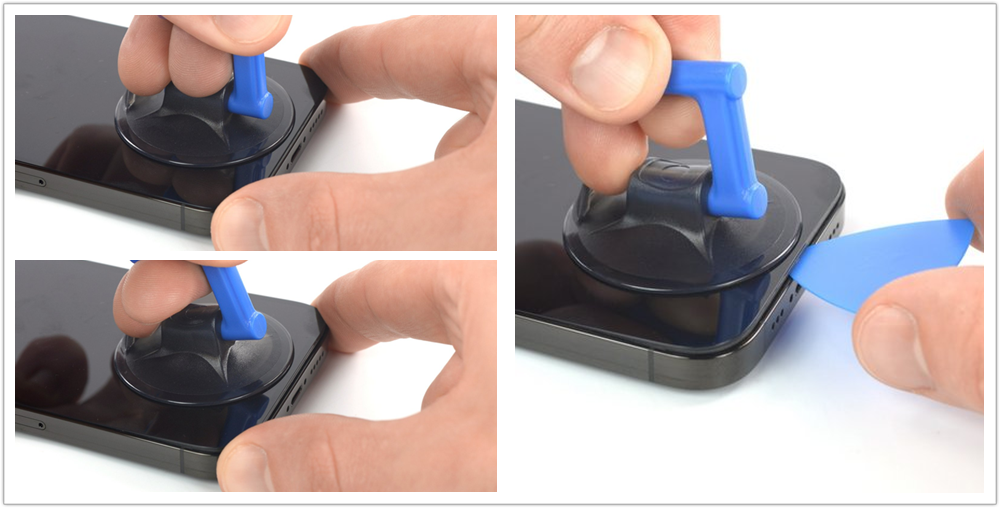
The adhesive holding the screen in place is very strong; creating this initial gap requires a lot of force. If you are having difficulty opening the gap, then add heat and gently shake the screen up and down to weaken the adhesive until you have created enough of a gap to insert your cotter pick.
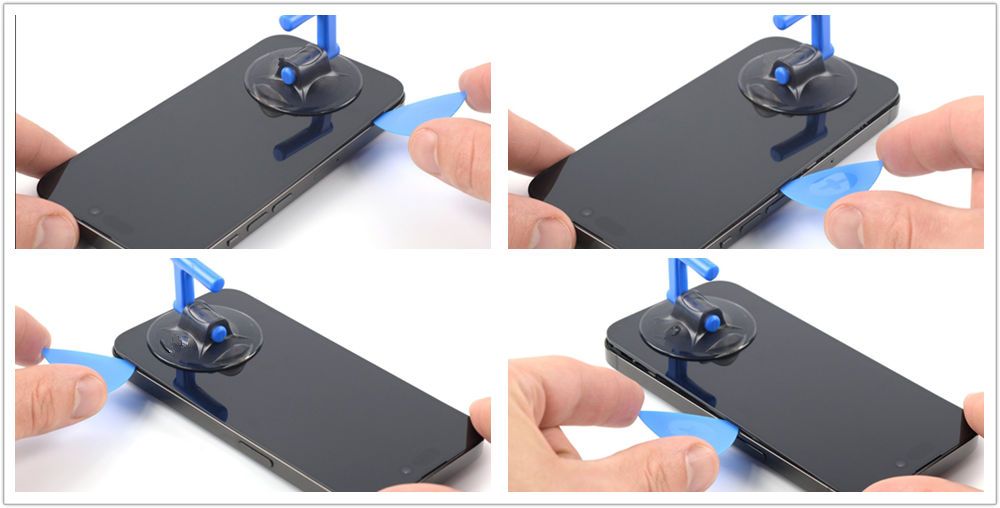
Step 4 Slice the Left and Right Edge Adhesive
1.Apply a heating tool to the left and right edge of the screen to loosen the adhesive underneath for at least 2 minutes.
2.Slide the opening pick around the lower left corner and up the left edge of the iPhone, slicing through the adhesive holding the screen in place.
3.Re-insert your pick at the bottom edge of the iPhone, and slide it up the right side to continue separating the adhesive.
The adhesive holding the screen in place is very strong; creating this initial gap requires a lot of force. If you are having difficulty opening the gap, then add heat and gently shake the screen up and down to weaken the adhesive until you have created enough of a gap to insert your cotter pick.
Note:Don't insert the opening pick more than 3 mm into the iPhone, or you may cause damage to internal components.
Step 5 Heat and Slice the Top Edge Adhesive
1.Apply a heating tool to the top edge of the screen to loosen the adhesive underneath for at least 2 minutes.
2. Insert your pick underneath the top edge of the phone. Slide it around the top-right corner and half way across the top edge stopping right before the earpiece speaker cut-out.
Note:
Don't insert the pick more than 2 mm or you may damage the front panel sensor array.
Don't try to fully separate the screen yet, as several fragile ribbon cables still connect it to the iPhone's logic board.
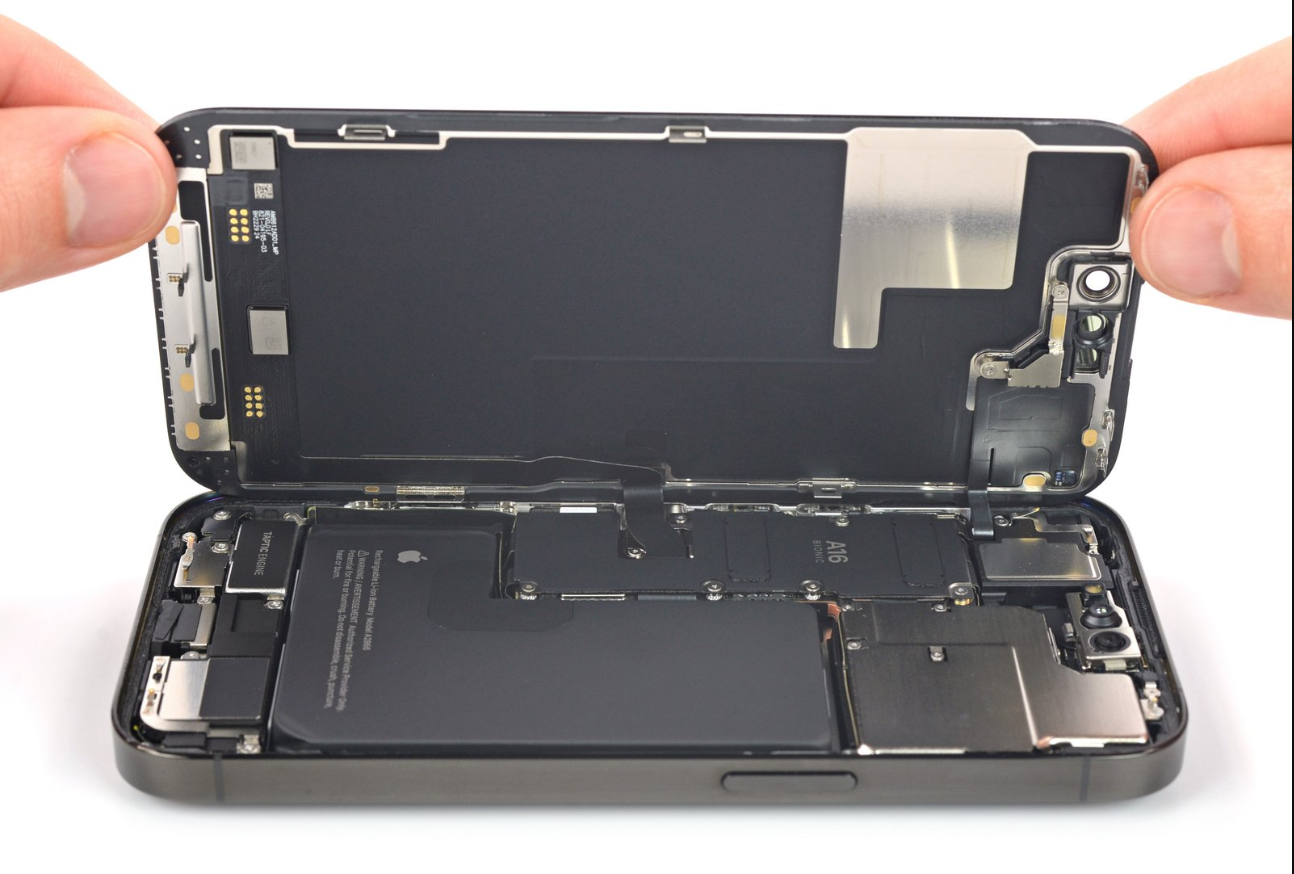
Step 6 Open the iPhone
1.Remove your suction handle from the screen.
2.Open your iPhone by swinging the screen up from the right side, like the front cover of a book.
3.Lean the screen against something to keep it propped up while you're working on the phone.
If you don't have anything at hand to lean the screen against, your suction handle can do the trick.
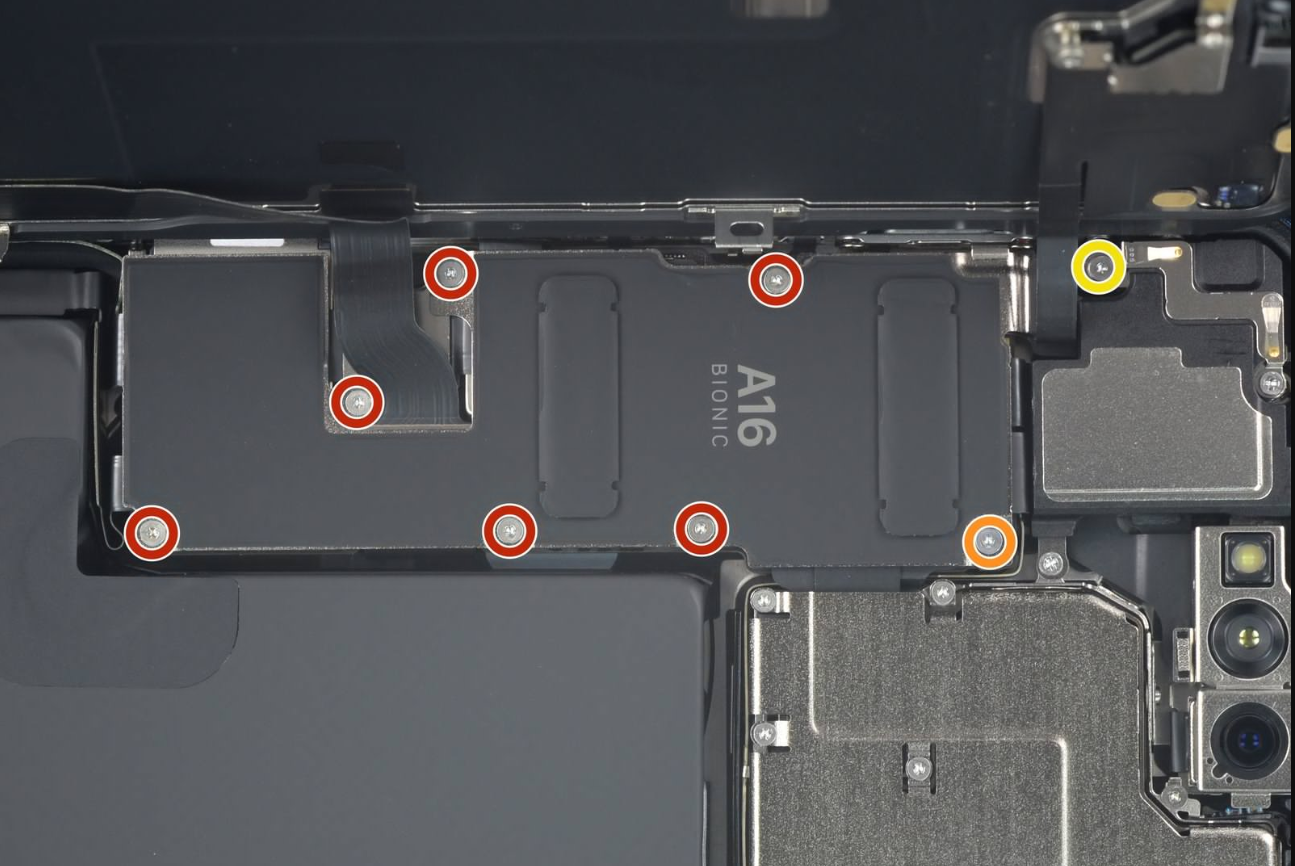
Step 7 Unfasten the Battery Connector Cover Screws
Use a Y000 screwdriver to remove the eight screws securing the battery connector cover:
Six 1.3 mm-long screws
One 1.6 mm-long screw
One 1.9 mm-long screw
Throughout this repair, keep track of each screw and make sure it goes back exactly where it came from to avoid damaging your iPhone.
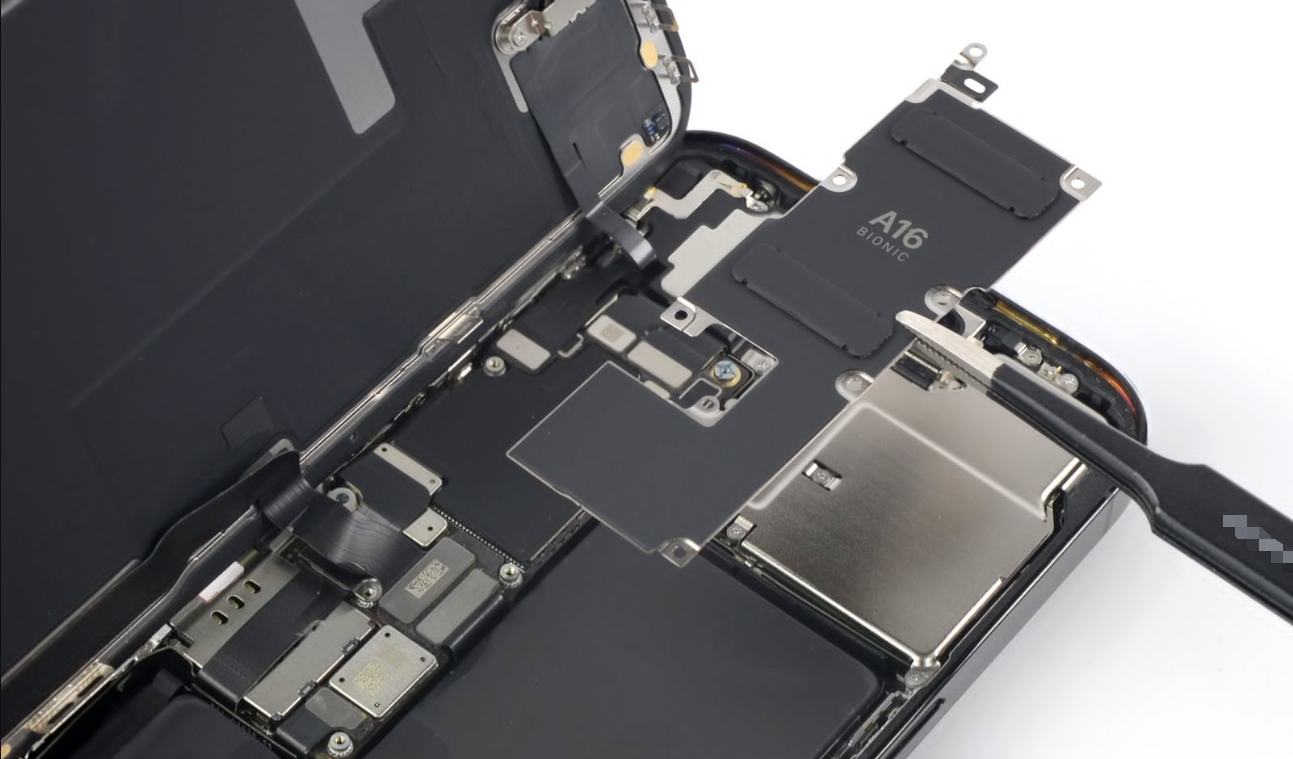
Step 8 Remove the Battery Connector Cover
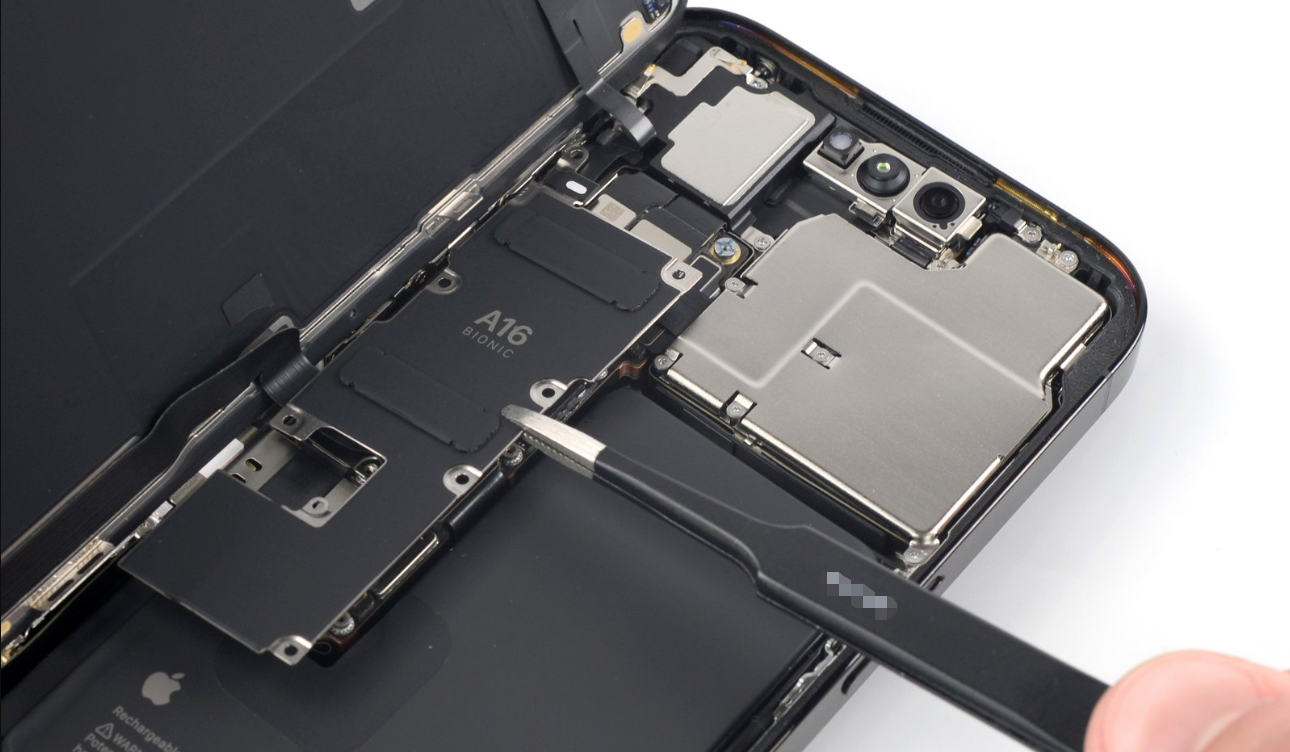
1.Grasp the connector cover with a pair of tweezers and slide it downwards to clear the flex cables.
2.Remove the connector cover.
Step 9 Disconnect the Battery
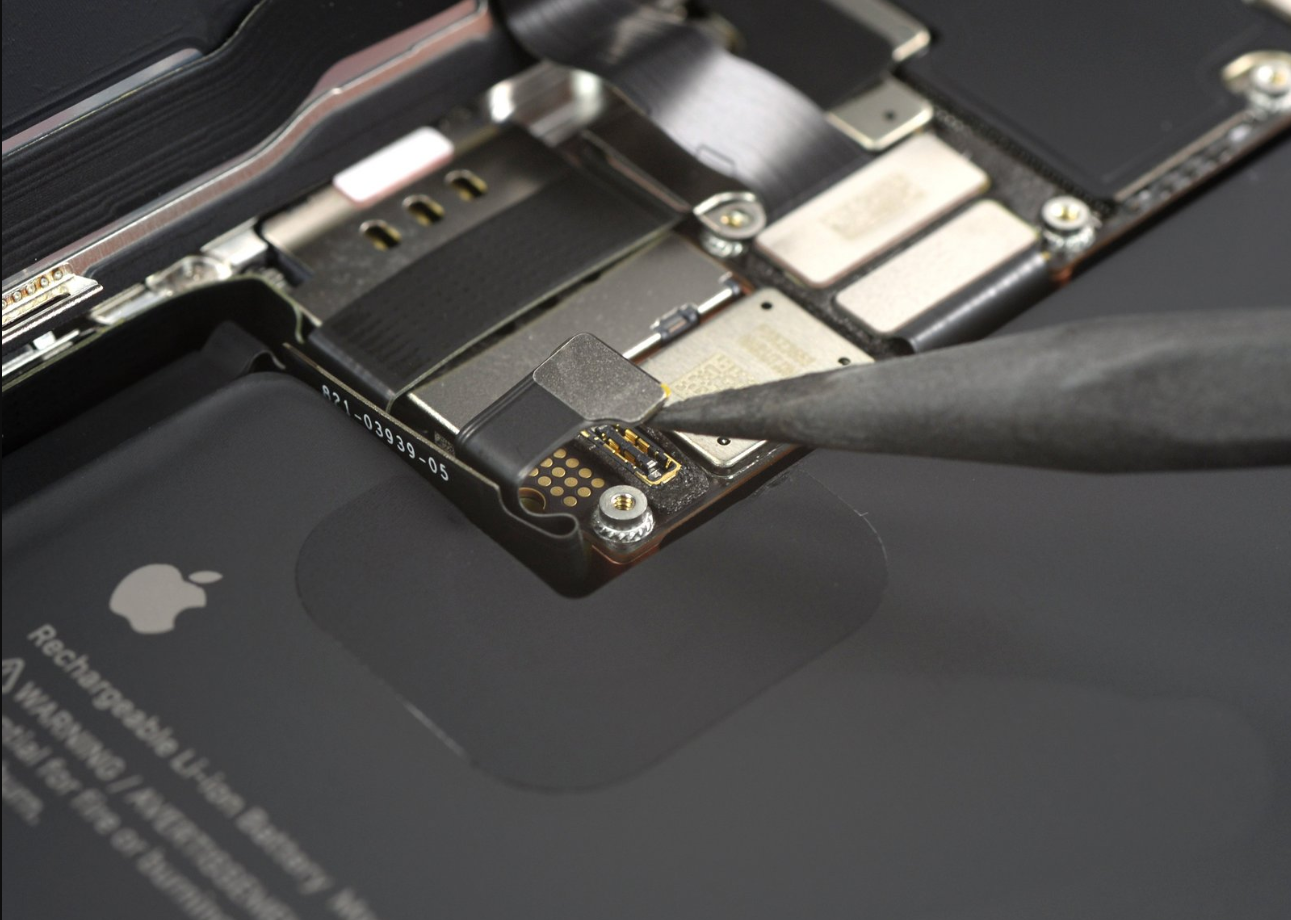
1.Use the pointed end of a spudger to disconnect the battery cable by prying the connector straight up from its socket.
2.Try not to damage the black silicone seal surrounding this and other board connections. These seals provide extra protection against water and dust intrusion.
3.Bend the connector slightly away from the logic board to prevent it from accidentally making contact with the socket and providing power to the phone during your repair.
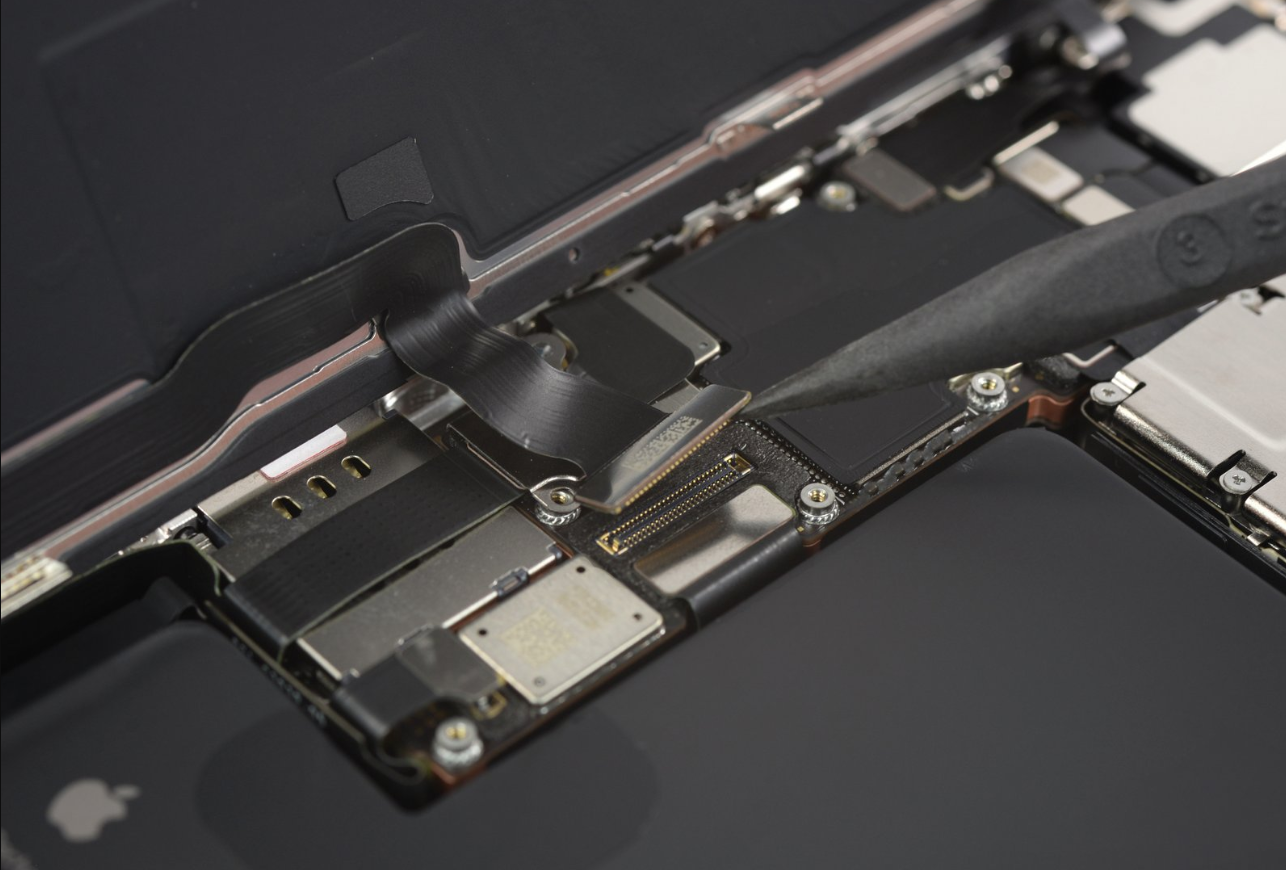
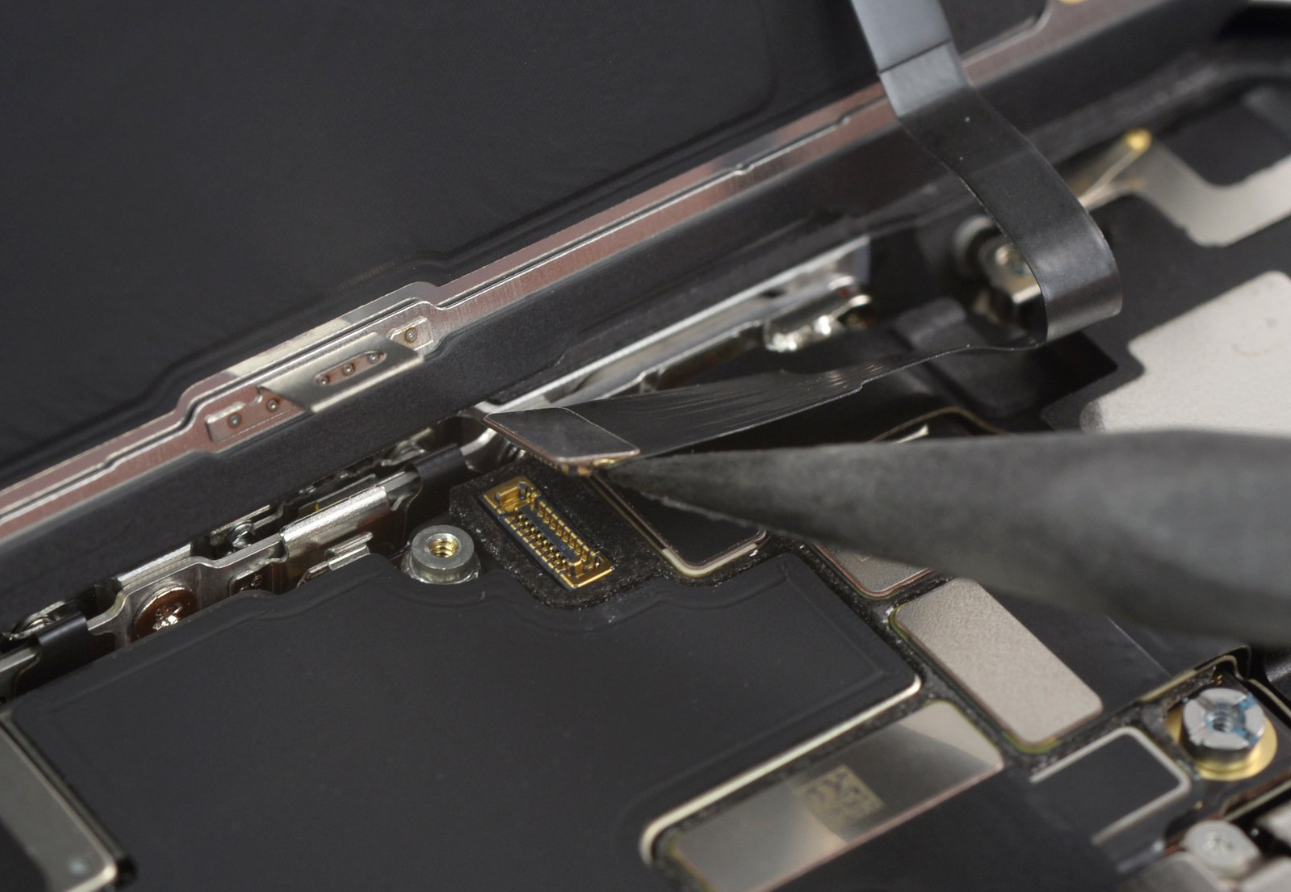
Step 10 Disconnect the Display Cable
Use the pointed end of a spudger to disconnect the display cable by prying the connector straight up from its socket.
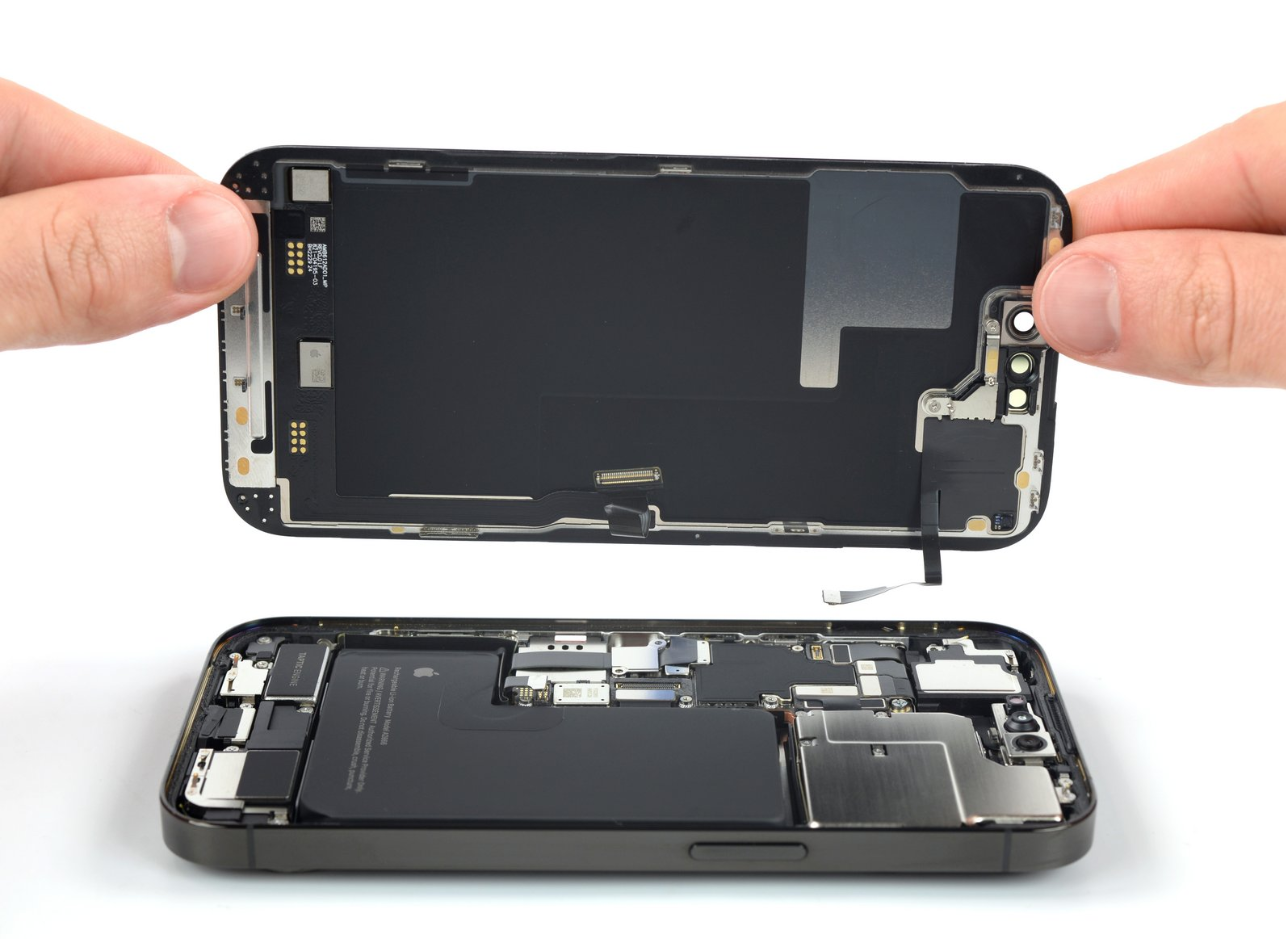
Step 11 Remove the Screen
Remove the screen.
Note:
Apply new adhesive where it's necessary after cleaning the relevant areas with isopropyl alcohol (>90%).
If possible, turn on your device and test your repair before installing new adhesive and resealing.
To reassemble your device, follow these instructions in reverse order.


We use cookies to offer you a better browsing experience, analyze site traffic and personalize content. By using this site, you agree to our use of cookies.
Privacy Policy